

The best way to ensure that your catalog has a fantastic cover page is, of course, to hire a competent design studio. Professional photographers and graphic designers are very skillful people, and with their technical knowledge, creative flair, and years of experience, the end product is guaranteed to be fantastic. And very expensive. For the established major brands, this expense is justified – and for the volume of catalogs that such brands regularly produce, it is hardly even significant. But for a small brand or startup, the costs involved in professional design are usually a show stopper. However, the show can go on. With just an entry-level camera (or even a phone), a little creativity, and a spare hour, a startup brand can also have a visually appealing cover page for its catalog.
How good your catalog’s cover page will look is determined by how good your image is. So you need to upload an attractive image. Step one is to take the very best photograph that you can. Step two is to edit it to meet your requirements. There are many options available for you to use, from simple online apps to fully-featured image editing software such as Adobe Photoshop or GIMP. In this article, we will be using GIMP (the GNU Image Manipulation Program). GIMP is open source software, and is available for Microsoft Windows, Mac OS X, and GNU/Linux systems. It can be downloaded for free from https://www.gimp.org/downloads.
What Size Does the Image Need to Be?
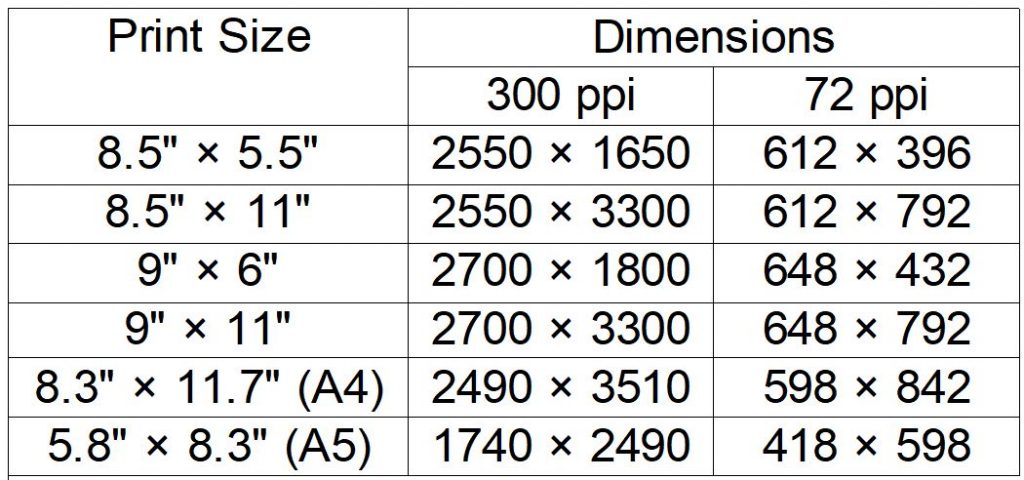
There are two factors to consider when deciding on the technical specifications for images; the resolution in pixels and the definition in ppi. Resolution is how many pixels make up the image, and it is expressed as width × height. The ppi (pixels per inch) refers to the quality of a printed image. For an online catalog or downloadable pdf that is only meant to be viewed electronically, 72 ppi is sufficient, but if the image is to be printed then it should be set to a minimum 300 ppi (in fact, because most consumers now have broadband connections, this has become the standard). The relationship between image size and ppi is as follows:
Print size (in inches) = Image size (in pixels) ÷ Print definition (in ppi)
So for a printed image measuring 11.5 inches × 8 inches at 300 ppi, the resolution should be 3450 × 2400 (This is 8,280,000 pixels in total – so well within the capabilities of an entry-level digital camera).
The same image, optimized for viewing purely electronically at 72ppi, would be smaller (828 × 576).
Dimensions for other common print sizes are shown below:-
It is therefore a good idea to start with an image that is at least large enough for the minimum specifications. The image can then be cropped and scaled to meet the requirements. GIMP is an excellent tool for this purpose.
Image Composition
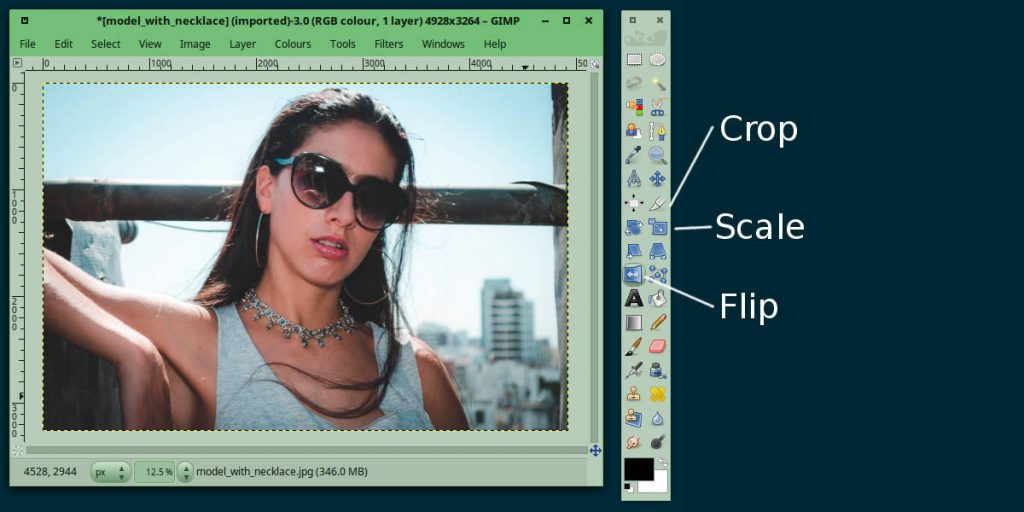
Professional artists and photographers are experts at composition, but there are a few tips and tricks that they use repeatedly which a good amateur can copy. Use of negative space comes high on this list. When a photographer takes a picture of a model for a cover page, the model is hardly ever in the center of the image, but is looking towards the center (usually from the right). You can use this technique to easily improve everything from product promotions, to cover pages, to family holiday snaps. To prevent the model looking directly at the camera, just get an assistant to stand out of shot, and ask your model to look at the assistant while you take the photograph. Focus the camera on the model, and then move so that the model is no longer centered. This simple trick of the trade is so effective, and gives surprisingly good results. However, as this is just a demo and I don’t have either a camera or a model handy at the moment, I’m going to use the image below: Photo by Nicolas Postiglioni from Pexels (The original downloaded image measured 4928 × 3264, whereas this image has been scaled to 1200 × 795).

This image would make a great cover page for a jewelry lookbook, but it needs a little work. Here is how to flip, crop, and resize the image using GIMP.
Editing Images Using GIMP
GIMP is a fully featured graphics app, and its user interface can seem a bit daunting at first, but it is intuitive and easy enough to get the hang of. In this example, only Flip, Crop, and Scale are used.
First, flip the image horizontally, so that the model is looking from right to left: Just click on the flip tool (or use the menu: Tools → Transform Tools → Flip), and then click on the image to flip it horizontally (if you hold the control key down while you click, you can flip vertically). Next click on the crop tool, and select an area of the image. The area can be more closely defined by using the Tool Options dialog. From the menu:
Windows → Dockable Dialogs → Tool Options
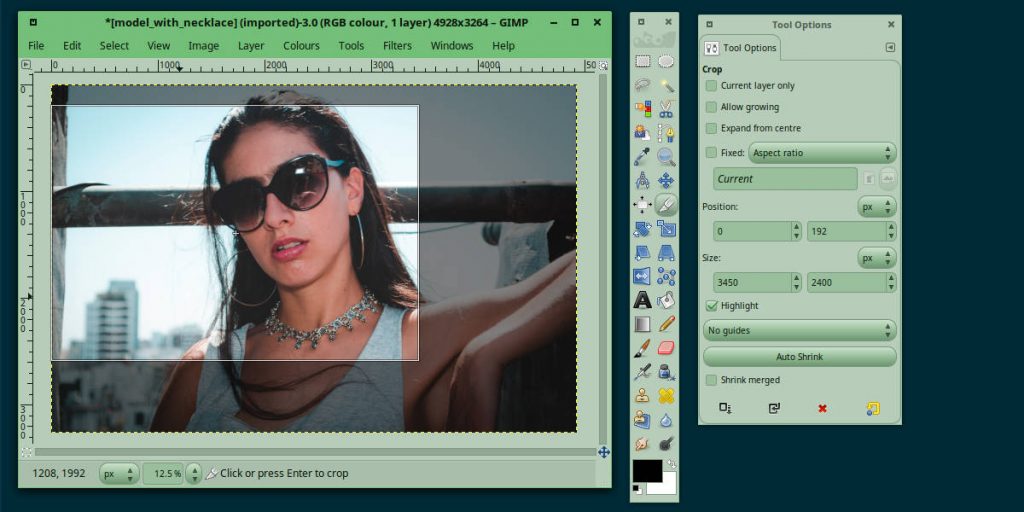
Within the Tool Options dialog, enter the size in the text boxes: 3540 and 2400.
You can adjust the size and position of the crop area within the dialog, by using the spin controls to the right of each text box. In the image, the crop area will be resized or repositioned accordingly.
To crop the image, click in one of the corners of the crop area. Here is the image for the cover page:

This image does not need to be resized – it has been scaled here for the purpose of displaying it on this web page – but if it you do need to resize an image, there is another useful tool. The Scale Image tool can be opened from the menu:
Image → Scale Image
All that remains is to export the image as a jpeg,
From the menu: File → Export Image
Simply select the location to save the image, enter the filename with a .jpg extension, and follow the prompts as they appear (GIMP notices the .jpg extension and converts accordingly).
With experience, you can do almost anything with GIMP. However, for the purpose of creating a catalog cover page, there is no need to do this. It is far easier to upload the image to Catalog Maker. Within Catalog Maker, you can add text, logos, and other branding elements as required. To find out how to use Elements to enhance a cover page, check out our video tutorial:-


 ជួយអាជីវកម្មកាន់តែឆ្លាតវៃ")
")


 ជួយអាជីវកម្មកាន់តែឆ្លាតវៃ")

